Creating Automated Workflow Definitions
In order for users to create user-initiated request workflows, the system first needs to have a range of workflow definitions (like templates) that are appropriate for the company. These would usually be set up by the administrator/s ofkiosk.
For example, you might need to create new Training request definitions because your company wants to have a range of training options, such as 'Internal training', 'Office Staff training', 'WHS training', 'Factory Staff training'. Therefore you would create all of these as individual Training Request Workflow Definitions, using the predefined Training Request template.
Then, when a user wants to create a training request which is appropriate for them, such as WHS Training, they select that option from the list of definitions you have created - note that they do this via Training (as described in Create Automated Workflow) not via the Admin area which is discussed next.
- In the Admin menu, select Workflow Definitions
The screen displayed will list any definitions that have already been created. - Click Add Workflow
- The screen will display a number of sections to be completed, including:
Workflow Summary
Email Templates
Actions
Note that the range of sections will change depending on the Workflow Template you select at the next step. (See Templates and Associated Sections below.) - In Workflow Summary, click the drop-down arrow for Workflow Template. This displays a pre-defined list of templates on which you can base the new Workflow Definition that you are creating.
- In Workflow Summary, give the new workflow definition a Title and Description, then click Save at the bottom of the window.
Note that nothing else is active in this window until the new workflow definition is saved. - To ensure that this workflow definition is available for selection by users, check the Active checkbox next to Properties.
- Data cap (items) refers to the limit you may decide to place on the events/emails that can be triggered by this workflow.
For example an Action Items Reminder workflow may trigger multiple reminder emails to be sent to employees.
The number here must be in the range 0-1000, but note that in this instance 0 will initiate the default number of 100, as zero items are not allowed. - Each of the sections displayed (i.e. those which are associated with the selected template) will need to be completed - as follows.
- Click Save to complete the creation of the workflow definition. The new Workflow is displayed in the list of Workflows at the top of the window.
Templates and Associated Sections
These are the templates that can be chosen, along with the sections that will be displayed for the selected templates:
| Sections Available | ||||||||
| Workflow Templates | Triggers | Details | Scheduler | Email templates | Actions | Approvers | Escalation | Security |
| Employee New Starter | Y | Y | Y | |||||
| Employee Rate Change | Y | Y | Y | |||||
| Field Change Notification | Y | Y | Y | Y | ||||
| Employee Birthday Workflow (report) | Y | Y | Y | Y | ||||
| Employee Birthday Workflow | Y | Y | Y | |||||
| Employee YOS Workflow (report) | Y | Y | Y | Y | ||||
| Employee YOS Workflow | Y | Y | Y | |||||
| Date Reminder | Y | Y | Y | Y | ||||
| Action Items Reminders | Y | Y | Y | Y | ||||
| Leave Request Workflows | Y | Y | Y | Y | Y | |||
| Training Request | Y | Y | Y | Y | Y | |||
| Events Request | Y | Y | Y | Y | Y | |||
| Property Request | Y | Y | Y | Y | Y | |||
| Skills Request | Y | Y | Y | Y | Y | |||
| Performance Review Workflow | Y | Y | Y | Y | Y | |||
Triggers
For templates with Triggers, these are detailed in this section, as per this example:

The Trigger/s defined by the current template may need to be edited for the new workflow definition you are creating. If so, click the  button in the Action column.
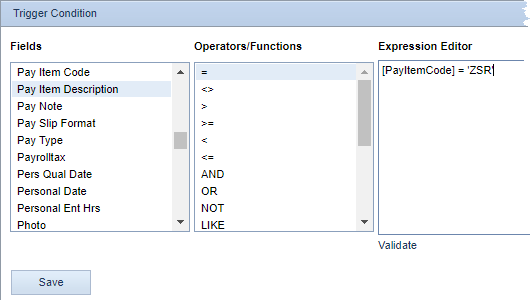
- The Expression Editor displays the condition (or rule) by which the trigger is activated.
- You may need to amend the rule, by changing the existing content or by adding to it (in which case, you can click at the end of the existing rule and press your Enter key to move to a new line).
- Initially the Operators/Functions box is blank, however when you select a Field name (by double clicking it), that name is automatically added to the Expression Editor. In addition the complete list of available Operators/Functions is now displayed. Double click an appropriate option from the Operators/Functions list to add it to the new rule, then complete the rule by typing in the required text.
In this example the workflow is triggered when the Pay Item Code used is ZSR.
Example of Trigger Condition table:

- When complete, click Save to save changes.
Note that some steps of the Trigger workflow may not require a condition, in which case the Expression Editor will be blank. For example an Insert trigger may apply if anything is inserted on a specific table, and not just when a certain field is updated with a certain code (as is the case in this example).
Details
This shows the table to which the trigger is attributed. For example a workflow definition for Field Change Notification may be triggered by updates to the Company table .
Scheduler
Specify the Active Period - i.e. the start date and, if applicable, the end date for the workflow definition. Ensure that Use Default Scheduler is ticked. This will apply the default workflow scheduler which must have been activated in Admin | System Options: the AW tab displays the default scheduled time; typically this is 00:00 (midnight).
Email Templates
All Workflow Templates enable the use of Email Templates. The person creating the Automated Workflow selects the most appropriate Email Template. This email template is then used when the associated Automated Workflow is processed.
Actions
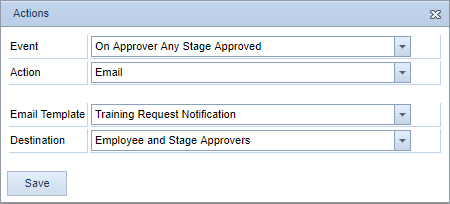
All Workflow Templates enable the use of Actions. The Actions themselves are determined by the creator of the Automated Workflow. They specify what Action item (i.e. email/SMS/Task/Email and SMS) should be processed, and to whom, when a particular event occurs.
Click Add Action to display the Actions dialog box:

Once you have specified the appropriate action, click Save.
Note that currently Email is the only supported option.
Approvers
This lists any approvers defined for the selected workflow template, per Approval Stage. This may be appropriate for the definition you are creating, but you may also add further Approval Stages and approvers for each of those stage (this is relevant if the particular Request requires multi-level or multi-stage approval).
Escalation
Use this option to specify how long to wait for the relevant approver to respond. If there is no response within that time, the workflow will be escalated to the position specified here.
By clicking Repeat escalation, this applies the wait time again before re-escalating if necessary.
Security
Tick the relevant User Groups - i.e. those who may view and utilise the associated workflow.
Unless the security has been set-up correctly, the Automated Workflows may not be available for the appropriate Users or Groups.
See HR3 kiosk Access and Security for more information on Security within HR3 kiosk.
Return to Automated Workflows
